The Huawei E5330 is a MiFi router that has the bad habit to block the SIM for incoming calls, causing the phone line to appear busy. You find a lot of guidance online, including a step to call a hidden website: http://192.168.8.1/html/switchProjectMode.html. However, that webpage “switchProjectMode.html” does not exist on Huawei E5330. This blog post describes an alternative, end-to-end solution.
What’s the problem?
- The Huawei E5330 operates in Circuit Switching (CS) mode, so it can also receive SMS text messages. For no good reason, it also responds to incoming phone calls by sending a “busy signal” to the caller.
- This is highly problematic if you have multiple SIM cards linked to one phone number. There doesn’t seem to be an agreed industry term for this, but German providers call this MultiSIM, UltraCard or Multicard. One SIM is in your phone for calls and mobile data, the other might be in your MiFi router for data only. Now when your Huawei device blocks phone calls, you can no longer be reached on your phone!
- One workaround is to set the MiFi router to Packet Switching (PS) mode. That way it has no longer access to the phone line.
- Tutorials and forum posts online recommend to do the following:
- Connect the device via USB to your PC
- Switch to “COM port mode” using switchProjectMode.html
- Send the AT modem command “AT^SYSCFG=2,2,3FFFFFFF,1,1” to the device’s COM port to switch to PS mode
- While a few people claim to have succeeded with these steps, my Huawei device doesn’t seem to serve this hidden website. I’m always being redirected to the device’s homepage.
The following chapters describe step-by-step how to do the same without switchProjectMode.html.
Preconditions
- I’m on Windows 10.
- The product’s full device name is E5330Bs-2.
- Hardware version is CH1E5330SM.
- Firmware version is 21.210.09.00.1080.
Switch Huawei E3550 to serial mode
- Before turning it on, connect the router to your PC via USB and wait for it to boot.
- When the battery icon turns on permanently, hold the “Power on” button, until the device starts the actual router mode.
- Open the “Device Manager” in Windows’ Control Panel. In section “Network adapters” search for “Remote NDIS based Internet Sharing Device”. If you don’t find it, the device is likely to be still in “CD/DVD drive mode”, so repeat the steps from before.
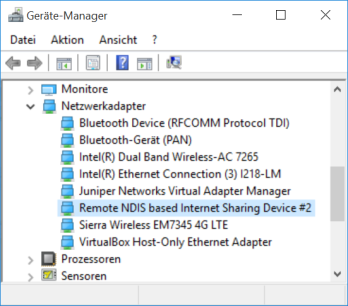
MiFi router appears as NDIS device in Device Manager - Download the .zip file[1] from asiantuntijakaveri.fi[2]. It’s a large collection of tools to flash the firmware of Huawei Modems.
- Alternatively, download only the command line script from [7]
- Extract and unzip the folder “[3] Switchmode E3372h”
- Verify that your MiFi router is reachable under http://192.168.8.1/ and log in. Default credentials are “admin”/”admin”.
- Run the “sw_project_mode.cmd” script
- Back in the Device Manager you should find “Unknown devices”. Those are the router’s COM ports.
- Install the FcSerial drivers[3]
- If not instantly, at latest after a reconnect you should find the COM ports in the Device Manager’s section “Ports (COM & LPT)”
- Remember the “PC UI” port’s name. COM5 in my case.
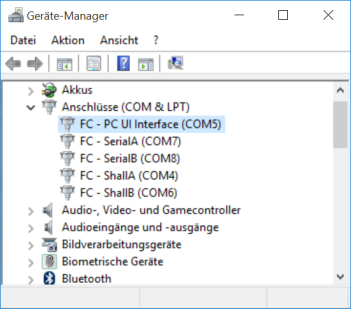
Correctly installed COM ports of the Huawei E5330 router
Connecting to the COM port and enabling PS mode
- I recommend Putty[4] as a terminal emulator to connect to the serial console. It allows you to paste commands, which will be very useful and safe as well. There is also a portable version on other websites.
- In Putty, connect to the COM port.
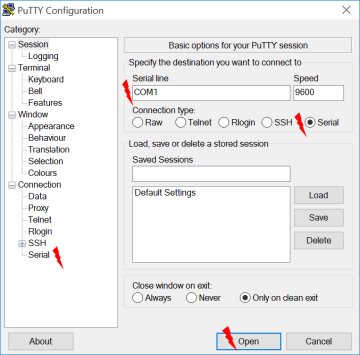
Necessary and optional settings in Putty If the connection can’t be established, have a look in the “Serial” options in the left menu. You can try the same settings as you find them in the “Properties” dialog of the COM port in the Device Manager.
- You should disable the mobile data connection of your router by now. Otherwise the terminal will be spammed with output.
- Once you are connected, make yourself comfortable with the shell by sending these harmless commands followed by Enter:
- ATE1 – activate this command to see your typed keys in the console!
- ATI
- AT^FHVER
- AT^VERSION?
- Check your current system’s state with “AT^SYSINFO”. The values are explained here: [5].
- Now, most important, change your config with
- AT^SYSCFG=2,2,3FFFFFFF,1,1
- wait a few seconds for the command to be processed
- Source: [6]
- Close the terminal.
- Restart the device.
You’re done!
Let me know in a comment, if this worked for you or not. 🙂
If the download links are broken also let me know, so I can provide a mirror.
Links
-
- [1] Collection of tools to flash a new firmware to your Huawei – includes the switch mode command line tool
- [2] Convert Huawei E3372h-153 from HiLink/router-mode to Stick/modem-mode – The first steps include the activation of the COM port mode
- [3] Huawei-Debug-and-Project-mode-drivers-FcSerial – Drivers for the serial COM ports of the Huawei E5330
- [4] Putty homepage – Terminal emulator
- [5] Description of AT^SYSINFO – Reference book for AT commands
- [6] Huawei E5830 / E5832S / E585 / E586 und MultiSim + Update für neue Huawei Geräte – German tutorial to disable CS mode, relies on switchProjectMode.html
- [7] Command line tool to switch project mode – a .zip file download. This is an alternative to [1].
- Huawei Set Modem Mode 3G/GPRS – More details about the available options in the mentioned SYSCONFIG command

Thank you very much! This article is so helpful for me. It all works perfect. I have the same hardware and software version but Windows 7 and a trial version of “Hyper Terminal Private Edition”.
LikeLiked by 1 person
You’re welcome 🙂
Why did you choose “Hyper Terminal” instead of Putty? Does it allow pasting commands from the clipboard as well?
LikeLike
Yes it does allow copy&paste and it also shows all the commands you are typing in. The only reason I’m using Hyper Terminal was because i have installed it before. 🙂 It was mentioned in another article which didn’t worked for me.
LikeLike
Super! Vielen Dank! Hat bei mir unter Windows 10 für den Huawei 8231 funktioniert!
LikeLike
Vielen Dank für die sehr gute Anleitung. Ich habe 8 Huawei E5330 wieder zum Laufen gebracht.
Du musst nur bei der Putty Konsole erwähnen das der eingegebene Befehl nicht sichtbar ist
Vielen Dank
Jürgen
LikeLike
Hallo Jürgen,
gleich 8 Stück? Wow!
In jeder Konsole ist nur sichtbar, was das Gerät sendet. Damit zu siehst, was du tippst, muss das Gerät in den “echo Modus” gehen. Deswegen hab ich im Artikel auch als ersten Befehl ATE1 empfohlen 😉
ATE1 – activate this command to see your typed keys in the console!
LikeLike
Hi Peter,
Thank you for the tutorial. Great stuff! With small modifications I was able to fix the “line busy” bug on a HUAWEI LTE stick E3372. Instead of COM5 my PC UI Interface was found at COM21.
However, I had to slightly modify the AT^SYSCONFIG command to:
AT^SYSCFG=2,0,3FFFFFFF,1,1
I found this command line here:
http://www.deepthought.ws/mobile/huawei-mobile/huawei-set-modem-mode-3ggprs/
After using your command “AT^SYSCFG=2,2,3FFFFFFF,1,1” I only had 2G connectivity.
Not real easy for me to find out which value is which. Maybe you can comment?
Thanks again,
Arne
LikeLiked by 1 person
Hi Arne,
great to here that my post was helpful!
Which COM port has to be used will vary from case to case. I think your operating system will chose a port on demand. That’s why you have to look up the correct COM port number in the device manager.
I have no more information about the SYSCONFIG commands, that’s why I linked to deepthought.ws and others.
Best regards,
Peter
LikeLike
Hallo, gibt es auch eine Lösung für den E8372 ?
LikeLike
Bis zu welchem Schritt funktioniert’s denn? 😉
LikeLike
Naja, noch ist er in der Post. Daher weiß ich es nur aus etlichen Postings bzw. Rezensionen im Netz.
LikeLike
Vielen Dank!
Klappte für mich (musste nur die Ziel-IP in der .xml-Datei ändern.
Hardware-Version: CL2E3372HM
Software-Version: 22.200.13.00.405
LikeLike
Hallo zusammen.
Unglücklicherweise hat das E8231 keinen Power Button, so dass die Anleitung für dieses Gerät nicht funktioniert. Hat es schon mal jemand mit einem E8231 erfolgreich durchgeführt? Und wenn ja, wie?
LikeLike
Bist du dir sicher, dass sich dein Stick überhaupt so verhalten würde wie der E5330? Also konkret, ob es sich um ein NDIS-Gerät handelt?
LikeLike
Hallo Peter.
Habe Deine Antwort erst jetzt gesehen. Yep – Er kommt unter Windows 10 als NDIS Gerät an.
Gruss – Klaus
LikeLike
Ja ok, aber dann ist doch alles cool – selbst wenn du keinen Power Button hast. Wenn dein Gerät bereits von sich aus als NDIS-Gerät angezeigt wird, dann machst du in der Anleitung einfach weiter ab dem Punkt:
>>> Open the “Device Manager” in Windows’ Control Panel. In section “Network adapters” search for “Remote NDIS based Internet Sharing Device” <<<
LikeLike
Hallo Peter.
Hat etwas gedauert, aber heute habe ich endlich Zeit gefunden, die Prozedur durchzuführen. Hat schlußendlich alles einwandfrei funktioniert, hatte nur etwas Trouble mit Putty. Der Stick, bzw. Das Modem hat ständig etwas in die Console gepostet, so dass ich nie genug Zeit hatte, das Kommando fertig einzugeben. Abhilfe: Das Kommando in Notepad fertig eingegeben, in die Zwischenablage kopieren und dann im Konsolenfenster rechte Maus (Das fügte bei mir zumindest das gesamte Kommando ein), und dann schnell ENTER drücken.
Das Originalkommendo von Dir wurde bei meinem E8231 mit Fehler beantwortet. Dann habe ich das Kommando von Arne (für G3) benutzt, und das wurde mit OK quittiert.
Getestet und alles gut! Perfekt! Nun kann ich über den Stick ins Internet und gleichzeitig auf meiner Multi-Sim angerufen werden und telefonieren.
Also auch von mir nochmals ein herzliches Dankeschön für die perfekte Vorarbeit.
Gruss – Charly
LikeLiked by 1 person
Wenn ich bei meinem E5573 den Befehl “AT^SYSCFG=2,2,3FFFFFFF,1,1” eingebe kommt nur Error.
Hat jemand eine Idee wieso? Habe die Anleitung genau befolgt…
LikeLike
Hi Niklas,
hast du keine Fehlermeldung dazu bekommen?
Schau mal in den verlinkten Artikeln, wo ich das Kommando her habe. Dort gibt’s vielleicht auch Kommandos speziell zu deinem Gerät.
LikeLike
My e5573 does the same thing when I try to reconfigure to PS mode. When set the command AT^SYSCFG=2,2,3FFFFFFF,1,1 the devide returns ERROR
LikeLike
There’s nothing about E5573
LikeLike
Hi, have the E8372 and If I enter AT^SYSCFG=2,0,3FFFFFFF,1,1 I get the message command not supported, any further ideas? tnx. markus
LikeLike
Markus, have you tried reading your current config?
https://m2msupport.net/m2msupport/atsysinfo-get-the-system-mode/
This could give you an idea what the correct manipulation command for your system might be.
LikeLike
Hello. Thanks for this tutorial. I also have the E5330Bs-2, and I wanted to use it as a modem on my Tomato router. Looks like the link [1] to the zip file is broken. Can you please post a mirror?
LikeLiked by 1 person
Hi,
thanks for letting me know, but I saw that in meantime an alternative DL link has been posted in the comments.
Anyway, I added a download that contains only for the command line scripts. You find it in the footnotes [7].
LikeLike
Thank you. I didn’t see the alternative link in the comments, but I managed to find an alternative link elsewhere. However, I suspect that my firmware version (21.210.27.00.00) blocks most AT commands and downgrade to another firmware. All commands other than AT, ATI, and “AT^VERSION?” returns an error, and I couldn’t downgrade to 21.210.19.00.00, which was the only firmware file I could fine online. Would you happen to have a link to another firmware I could try?
LikeLike
I fixed the link of [1]. I didn’t do anything with the firmware myself, but I just checked the content of the .zip file: It contains 21.180.01.00.00 and 22.180.05.00.00. Is that helpful for you?
Where did you find an alternative .zip file?
LikeLike
I found the alternate link by googling “sw_project_mode.cmd” and found this site: https://vutlan.atlassian.net/wiki/spaces/DEN/pages/19955732/USB+4G+3G+modems+setting
Looks like the firmwares found in the .zip file are for E3372h-153, so I doubt they will work for E5330, but I suppose I can give it a try when I get a chance. Thanks anyway!
LikeLiked by 1 person