Unable to delete one of your storage accounts in Azure? Getting error messages like the following?
Failed to delete storage account . Unable to delete storage account : ‘Storage account has some active image(s) and/or disk(s). Ensure these image(s) and/or disk(s) are removed before deleting this storage account.’.
Storage account has some active image(s) and/or disk(s), e.g. xxxxxxxxx-xxxxxxxxx-O-209490240936090599. Ensure these image(s) and/or disk(s) are removed before deleting this storage account.
How did I even mess up in the beginning?
I took the time to get some hands-on experience with Azure. I also installed an image from Bitnami containing Wildfly via the Bitnami Microsoft Azure Launchpad. When I had finished my test, I wanted to clear everything. Starting with Bitnami I deleted my account there. That was a mistake, because when I tried to clean up Azure afterwards, it gave me this error message (it’s in German, but it’s the same as above):
Fehler beim Löschen von Speicherkonto “bitnamisoutheastaottt3e8”. Speicherkonto “bitnamisoutheastaottt3e8” kann nicht gelöscht werden: “Das Speicherkonto “bitnamisoutheastaottt3e8” hat einige aktive Bilder und/oder Datenträger, z. B. “bitnami-bitnami-wildfly-10.1.0-1-southeastasia-oTTT3e8″. Entfernen Sie diese Bilder und/oder Datenträger, bevor Sie dieses Speicherkonto löschen.”.
However, didn’t work for me. I had no “Images” or “Disks” tab on the detail page of my storage account. I guess it’s outdated.
Using the Azure CLI to clean things up
These are the steps to get things done via the Azure Command-Line Interface. This will likely work only, if your storage account is a so called classic deployment! What’s the difference?
The Huawei E5330 is a MiFi router that has the bad habit to block the SIM for incoming calls, causing the phone line to appear busy. You find a lot of guidance online, including a step to call a hidden website: http://192.168.8.1/html/switchProjectMode.html. However, that webpage “switchProjectMode.html” does not exist on Huawei E5330. This blog post describes an alternative, end-to-end solution.
What’s the problem?
The Huawei E5330 operates in Circuit Switching (CS) mode, so it can also receive SMS text messages. For no good reason, it also responds to incoming phone calls by sending a “busy signal” to the caller.
This is highly problematic if you have multiple SIM cards linked to one phone number. There doesn’t seem to be an agreed industry term for this, but German providers call this MultiSIM, UltraCard or Multicard. One SIM is in your phone for calls and mobile data, the other might be in your MiFi router for data only. Now when your Huawei device blocks phone calls, you can no longer be reached on your phone!
One workaround is to set the MiFi router to Packet Switching (PS) mode. That way it has no longer access to the phone line.
Tutorials and forum posts online recommend to do the following:
Connect the device via USB to your PC
Switch to “COM port mode” using switchProjectMode.html
Send the AT modem command “AT^SYSCFG=2,2,3FFFFFFF,1,1” to the device’s COM port to switch to PS mode
While a few people claim to have succeeded with these steps, my Huawei device doesn’t seem to serve this hidden website. I’m always being redirected to the device’s homepage.
The following chapters describe step-by-step how to do the same without switchProjectMode.html.
Preconditions
I’m on Windows 10.
The product’s full device name is E5330Bs-2.
Hardware version is CH1E5330SM.
Firmware version is 21.210.09.00.1080.
Switch Huawei E3550 to serial mode
Before turning it on, connect the router to your PC via USB and wait for it to boot.
When the battery icon turns on permanently, hold the “Power on” button, until the device starts the actual router mode.
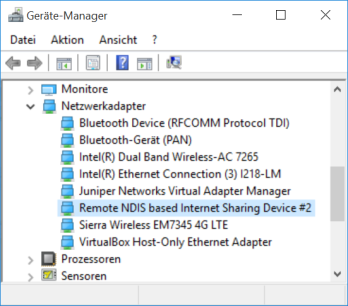
Open the “Device Manager” in Windows’ Control Panel. In section “Network adapters” search for “Remote NDIS based Internet Sharing Device”. If you don’t find it, the device is likely to be still in “CD/DVD drive mode”, so repeat the steps from before.
MiFi router appears as NDIS device in Device Manager
Download the .zip file[1] from asiantuntijakaveri.fi[2]. It’s a large collection of tools to flash the firmware of Huawei Modems.
Alternatively, download only the command line script from [7]
Extract and unzip the folder “[3] Switchmode E3372h”
Verify that your MiFi router is reachable under http://192.168.8.1/ and log in. Default credentials are “admin”/”admin”.
Run the “sw_project_mode.cmd” script
Back in the Device Manager you should find “Unknown devices”. Those are the router’s COM ports.
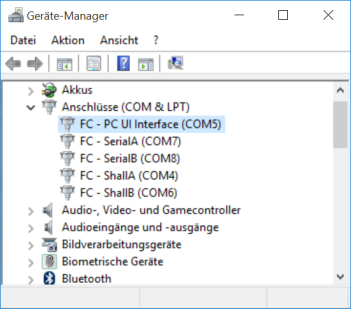
If not instantly, at latest after a reconnect you should find the COM ports in the Device Manager’s section “Ports (COM & LPT)”
Remember the “PC UI” port’s name. COM5 in my case.
Correctly installed COM ports of the Huawei E5330 router
Connecting to the COM port and enabling PS mode
I recommend Putty[4] as a terminal emulator to connect to the serial console. It allows you to paste commands, which will be very useful and safe as well. There is also a portable version on other websites.
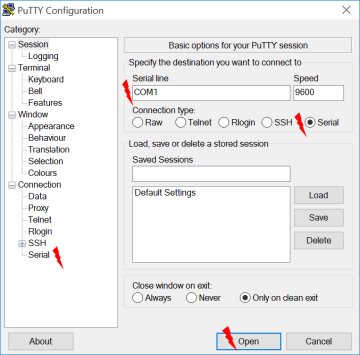
In Putty, connect to the COM port.
Necessary and optional settings in Putty
If the connection can’t be established, have a look in the “Serial” options in the left menu. You can try the same settings as you find them in the “Properties” dialog of the COM port in the Device Manager.
You should disable the mobile data connection of your router by now. Otherwise the terminal will be spammed with output.
Once you are connected, make yourself comfortable with the shell by sending these harmless commands followed by Enter:
ATE1 – activate this command to see your typed keys in the console!
ATI
AT^FHVER
AT^VERSION?
Check your current system’s state with “AT^SYSINFO”. The values are explained here: [5].
Now, most important, change your config with
AT^SYSCFG=2,2,3FFFFFFF,1,1
wait a few seconds for the command to be processed
Update: Meanwhile I found the time to prepare an open source library that provides you with a ready-to-use ParameterizedSuite! See my Github repo for detailed instructions.
When you come across this blog entry you certainly know the features of JUnit’s Suite and Parameterized classes: Suite lets you execute multiple tests as a test suite (i.e. as a group), Parameterized allows to define parameters for a single test case and execute each of the test’s methods with each tuple of the parameter set.
Now obvious questions are: How do I define parameters for a test suite? Why is there no ParameterizedSuite class in JUnit? How do I implement a parameterised suite by myself?
What I found funny when I was searching the Internet was that many questions seemed to came up in the context of Selenium. And this was exactly the reason why I needed to parameterise a test suite! My parameters would be the different browsers where I wanted to run the same tests. Seems as if developers and QA testers around the world stumble across the same problems but nobody offers a solution. It’s time for change! 😉
Why is there no out-of-the-box implementation?
I think, you don’t find a ready-to-use implementation of a ParameterizedSuite because:
The implementation of such a class is far from trivial. It is even hindered by JUnit’s “closed code” that doesn’t really allow extension and reuse. There are also some complex internal concepts in JUnit a developer normally doesn’t touch (e.g. Runners and Statements), but these are key to implement an own ParameterizedSuite.
Parameterized and Suite follow slightly different concepts of JUnit. Parameters are applied to instances of test classes, whereas during the processing of a Suite the class isn’t instantiated at all.
There can’t be a single one-size-fits-all implementation of ParameterizedSuite since there are quite a few design questions regarding the runtime behaviour of the class. These implementation details depend on your use case. I tried to summarise some of these questions in the next chapter.
The good news is: I was able to implement a ParameterizedSuite for my own use case.
The bad news is: It will take me some more time to share the code with you.
However, you certainly have other requirements anyway, so you don’t get around implementing your own ParameterizedSuite. In this blog post I’d like to give valuable insight for this implementation task.
For implementing your own ParameterizedSuite you can certainly copy a lot of code from Suite and Parameterized. The bigger challenge is to understand the internal concepts of JUnit, the runtime lifecycle of a test and how to combine both classes.
One last remark: You should double-check if you have alternatives to implementing your own ParameterizedSuite! It won’t only be very tedious and time consuming, but it could also be hard to maintain in the future when your requirements change.
One alternative I can think of is to parameterise the build job on your Continuous Integration machine and start a job for every parameter tuple you have. This is much easier to implement and maintain! You’ve been warned 😉
Design questions
Before you start your implementation, you should put some thought in your requirements (Well, that’s always true, isn’t it?). Try to answer the following:
Where should the parameters (the @Parameters annotation) be defined?
If you define parameters only at the Suite level, how should a single, parameterised test case behave if you start it standalone, e.g. from your IDE? Should it have own parameters as a fallback?
Will you implement a hierarchy of suites, e.g. a suite running suites running tests?
Do these sub-suites also have parameters? Do they add to the superior parameters, or overwrite them? Or do they act as a fallback like in the previous question?
How to transfer parameters top down?
When a suite provides parameters, how does a parameterised test case access them?
How do you want to execute the cross-product of test cases and parameters? Execute all tests per parameter first or all parameters per test before going over to the next test?
Do you want support for JUnit’s annotation based features like @Before, @BeforeClass, @After, @AfterClass, @Rule, @ClassRule, @TestName, @ExpectedException, @Timeout etc. in your ParameterizedSuites? Do you want to evaluate these once for your suite or for every parameter?
Hierarchy of parameterized tests: The test cases TC1 and TC2 are executed for parameter “aParam” first and for “bParam” afterwards.
Internal concepts in JUnit
There are a few concepts you should be aware of.
Runners
Suite and Parameterized are linked to your test class via the @RunWith annotation. Both are Runners and replace the BlockJUnit4ClassRunner, which is the default Runner and used to run single test classes. All three extend the ParentRunner class, which means that in practice in your IDE they appear as a node in your hierarchy of tests that has leaves or other nodes (so called children). The children of a BlockJUnit4ClassRunner are the test class’ methods. The children of a Suite are the classes from the @SuiteClasses annotation.
Statements
A runner builds a chain of statements in its run() method and executes it directly afterwards. This chain of statements is the actual execution order of a test’s features (See design question #5).
For BlockJUnit4ClassRunner the smallest piece of statement is the execution of a test method. Statements triggered by annotations like @Before or @AfterClass encapsulate this statement and execute own logic prior or after that.
A Suite maintains a list of child runners and generates a statement, which on execution calls run() for each of these children sequentially. This statement is decorated with evaluations of @BeforeClass, @AfterClass and @ClassRule, which annotate static methods and fields.
Instantiation of the test class
BlockJUnit4ClassRunner creates an instance of the test class for every test method. This happens in the methodBlock() method and is necessary to run the test methods. The annotations @Before and @After are evaluated in that method. For that reason those annotations are linked to non-static methods, while @BeforeClass and @AfterClass are not. The latter annotations are inherited from ParentRunner (and thus shared with Suite also), which doesn’t operate on test objects at all, but only on the not instantiated classes.
For this reason you’re not allowed to use non-static fields and methods for JUnit features in Suites.
Implementation details
Storing the parameters in a context
To pass the singularised parameters top-down, I decided to introduce a singleton ParameterContext. It holds the parameters for one test execution (i.e. Object[]). Later on the JUnit framework will pass this Object array via reflection as method arguments to the test class’ constructor. So if your constructor takes two arguments, your @Parameters method should produce Object[][2] and ParameterContext will store Object[2].
The ParameterContext is set by the ParameterizedSuite while iterating the set of parameters.
The test cases look up the parameters in the ParameterContext. If the context hasn’t been set (i.e. if you start the test case standalone, not within a suite), they have a set of fall back parameters that becomes active.
Depending on your decision on design question #2, non-top-level suites combine the behaviour of both parameterized suites and test cases: If no context is set, they set it. Otherwise they might extend the context or take no action at all.
Other solution designs are possible as well, but could be far more invasive to existing framework classes, e.g. by passing parameters to the RunnerBuilders.
ParameterizedSuite
To have greatest flexibility, my implementation extends ParentRunner directly and not Suite or Parameterized.
To implement a blended behaviour of both, you will certainly have to copy a dozen helper methods from these two classes, because most of them are private (as of JUnit 4.12).
Start with the constructor! Suite has a bunch of them, but you actually only need a 2-arg-constructor. Call super(Class) from there.
    public ParameterizedSuite(Class<?> suiteTestClass, RunnerBuilder runnerBuilder) throws Throwable {
super(suiteTestClass);
As in Suite, you already construct all your child runners in the constructor, so you have them available when ParentRunner asks you for them through getChildren().
If you have a multi-level hierarchy of ParameterizedSuites (i.e. a ParameterizedSuite of ParameterizedSuites of test cases) you will have to distinct two cases:
Is this ParameterizedSuite the top-level suite? Then you have to singularise the parameters!
If this is not, you don’t have to care about the parameters, but you might want to execute the annotation-based features (design question #5)
To determine the cases, you could check if the ParameterContext is already set.
Case: Top-level
Determine the set of parameters (i.e. Object[][] !). For each single parameter (Object[]) instantiate a new SingleParameterSuite() and pass that single parameter to it.
If the test class has annotation-based features you certainly want to execute these in the SingleParameterSuites but skip those now. So you have to overwrite ParentRunner.classBlock() and only call childrenInvoker().
Case: Non-top-level
“Just do, what a normal Suite would do”
In classBlock() be sure to run the annotation processing. Here you will have to “reuse” (i.e. copy) a lot of code.
SingleParameterSuite
Here you can extend Suite. But why do we need a specialised class for this at all?
First of all you should overwrite ParentRunner.getName() to return a unique name for every different parameter (like I did in the figure above). If you don’t and return a static name, at least in Eclipse only the first suite will be executed and the others with the same name will be skipped.
Here I also extended the annotation-processing of Suite: I instantiated the test class (lots of copied code again) and processed annotations like @Before, which are linked to non-static methods.
You should pass a reference of the test class (annotated with ParameterizedSuite) to the constructor SingleParameterSuite to:
to pass it as parameter “klass” to the super-constructor Suite(RunnerBuilder, Class<?>, Class<?>[]). This way the test execution logic will work as if we would directly run on the test class and not on the virtual sub-suite.
have direct access to its annotations methods.
Closing words
Although it will take me some more time to prepare the code for you, I hope this guide makes your life a bit easier already.